Getting started in Drupal, WordPress, or Backdrop website development can have a steep learning curve involving a lot of different parts of the system. Not only do we need to learn how to edit the code for the website, but we need a place where we can safely practice and make mistakes. We need to be able to run websites on our own computers, and we need good tools (applications) that can help us learn. That collection of tools is commonly called a “local development environment”, and this blog post is meant to provide an overview of some tools we like to use here at Hook 42.
What We Need for Web Development
To get started, we need to know what we're working with. Don’t worry too much about remembering all of these things just yet, because we’re going to pick specific solutions for each thing later in the post.
- Web server - This lets us host websites on our computer, allowing us to visit our local copy of Drupal or WordPress in our browser.
- Database server - Most modern content management systems require a database. A database server allows us to create databases on our computers that content management systems can use.
- IDE (Code Editor) - An “Integrated Development Environment” is a type of code editor that understands the code we are working with. It can identify mistakes, make suggestions, and help us debug and improve our code in many ways. I can’t stress enough how important it is to have a good IDE when writing code.
- Version Control System - When writing code we often have to edit a lot of different files in many different folders, and we often need to do this collaboratively with other developers. A good version control system allows us to save our code at lots of different states and pass those versions along to other people easily. The most commonly used VCS at the moment is Git. Later in this post we will install a Git client that will be very helpful when working with version control.
- SSH Keys - These are small files on our computers that act as passwords when dealing with online services such as Github, Pantheon, or some other remote server. If we’re using version control, we will certainly need an SSH key.
- Terminal (Command Line) - It’s often necessary to use the command line when working on websites. Terminals can be intimidating at first, but after working with them for a while we will get used to it, and heck, may even prefer it for some tasks.
Great! Let’s pick some solutions for each of these items. We’re going to work through the above list in reverse order, ultimately resulting in having a working local Drupal 8 website for development.
Note: If you already have solutions for the various tools provided below, feel free to skip that section and move on to the next.
Terminal
Out of the box, macOS and Linux both have excellent (and very similar) Terminal applications. Let’s take a moment to locate and open a terminal in each system:
- OSX - Open your Applications folder (or Launchpad) and search for the word “Terminal.” Click on the Terminal icon to open it. Consider pinning it to your dock for easy access in the future.
- Linux - Open your start menu and search for the word “Terminal.” Click on the Terminal icon to open it. Consider adding it to your favorites so that it always available in your dock.
With our working terminal we are ready to proceed to the next tool.
Git - Version Control System
Next up, lets download and install Git. As a quick reminder, Git is the tool we’re going to use for version control. By default it is only a command line tool and doesn’t have a graphical user interface, but we’ll take care of that shortly. Once Git installation is complete, let’s talk about getting a GUI for it.
Learning how to use Git on the command line (with our Terminal app) is a really great thing to know, but it’s not necessary to get started. Rather than halting our progress, let’s select a Git GUI that will do a lot of the hard work for us. For OSX users we recommend a free app called Sourcetree. For Ubuntu users, we recommend an app called Gitg. All of these, and other apps, are listed within the GUI section of the official Git website.
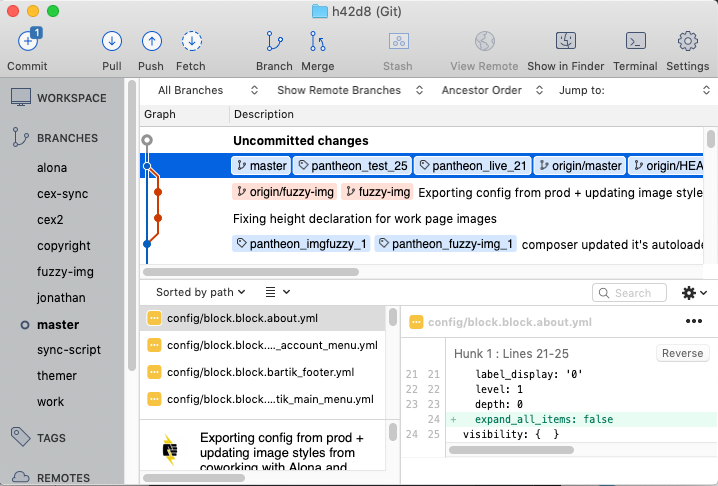
Sourcetree for MacOS
I’ve been using Sourcetree for over 5 years now and can’t tell you how much it has helped me learn Git. Having a GUI for Git is an incredible way to get comfortable with version control in general.
The Sourcetree software is completely free to use, but with one small caveat, we must have a Bitbucket account. Bitbucket is the Git repository solution provided by the company Atlassian. If you’re familiar with GitHub service, then know that Bitbucket is just like GitHub.
With that said, this will be our first stop on our journey of using Sourcetree, visit bitbucket.org and signup for an account. I’ll wait here… 😐
Welcome back! Now that the Bitbucket account has been created you can download and install Sourcetree. During the installation process you will be asked for your Bitbucket account information.
With that complete you should have a working Git user interface. It isn’t much help at the moment because we don’t have a repo, but I’m certain this will be a huge benefit to our future as web developers.
Gitg for Ubuntu (Gnome)
One of the easier apps to install, all we need to do is open the Ubuntu Software application and search for “gitg”. From there you can install it and launch it. This is an app you should consider adding it to your favorites.
If you decide that Gitg isn’t right for you (maybe you aren’t on Ubuntu, or don’t use Gnome), we recommend this article as another good place to find Git GUIs for Linux.
SSH Key Configuration
Before we can do too much with Git repositories, we need to ensure that our computer has an SSH Key that we can use when dealing with services that require them.
As a quick reminder, an SSH Key is a small file that acts somewhat like a password that computers can use to securely talk to each other.
Let’s get started by creating an SSH Key that we can use in the future. As with some previous sections, these steps will differ depending on your computer operating system.
MacOS & Linux w/ Terminal
MacOS and Linux all have SSH tools that come with the OS, so we can open a terminal window and fairly easily setup a new SSH key. The following steps will generate a new SSH Key.
- Open your Terminal window
- Ensure you have an ssh directory, and navigate to it. It’s not a problem if the system tells you that the ssh directory already exists. Here is how you do that:
mkdir ~/.sshcd ~/.ssh
- Check to see if we already have an SSH Key by entering the following line. (If so, it’s most likely named “id_rsa”.)
ls -al
- Now, generate a new SSH Key.
ssh-keygen -t rsa -b 4096 -o -a 100
Note: When generating a new key you will be prompted with a few questions, just press “Enter” to move past the questions using the default values. This will generate a key named “id_rsa”. Alternatively, you can choose another name for this key by answering the first question when prompted, but doing so may complicate future work if you’re not familiar with managing multiple keys. If step 3 showed that you already have a key on your system named “id_rsa”, choose a new name for your new SSH Key. The name can be anything, for example, “genericGit” is a fine name for a generic key you’ll use for various Git services.
Once all the prompts are answered or skipped, this command will create two new files in the .ssh folder. Both files have the same name, except one of them has the file extension “.pub” which is your public key. Don’t worry too much about the fine details here, just know that your “public key” is the key you can safely upload to other services.
Adding SSH to Bitbucket
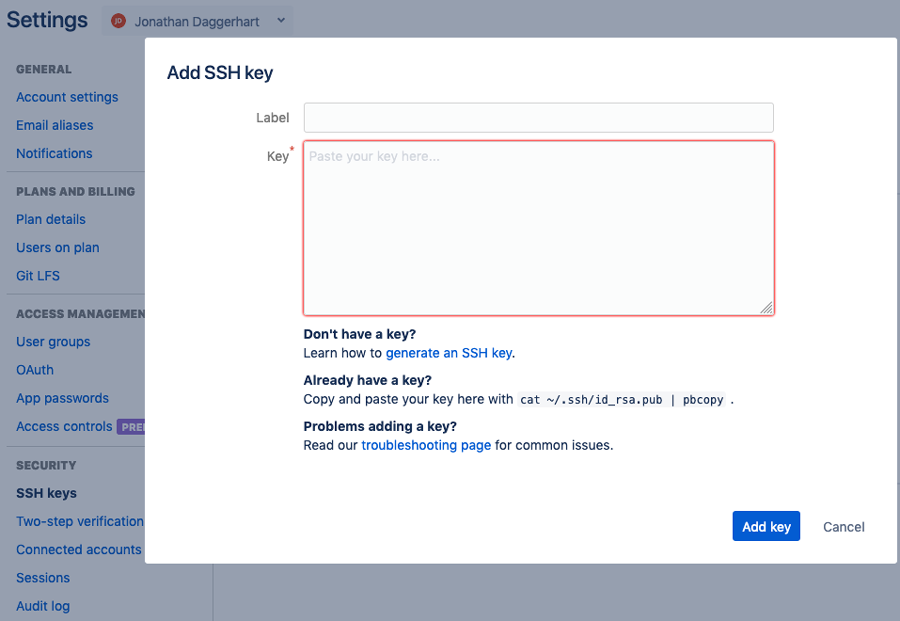
Now that we have an SSH Key, let's add to our new Bitbucket account.
Visit the article generating SSH Keys with Sourcetree and locate the section titled “Add the public key to your Bitbucket settings”. This will walk you through the process in more detail, but the steps are essentially these:
- Open your new public SSH Key and copy the contents of the file. This can be done a number of ways. For Terminal, here is a command that will print the contents of your SSH Key to the screen. Once on the screen, you can highlight and copy the key with your mouse.
cat ~/.ssh/id_rsa.pub
- Log into bitbucket.org and locate the option for “Bitbucket Settings”.
- From there, navigate to the section for “SSH Keys”.
- Click the button labeled “Add key”
- In the big text box labeled “Key”, paste your public key that you have copied.
- In the small text box labeled “Label”, provide a simple description of your key. I tend to describe it in terms of what computer I’m using. For example, “Hook42 MacBookPro”.
- Click the button labeled “Add key” to save your key to Bitbucket.
There we have it! We are now setup with a new SSH Key, and it has already been configured to work with Bitbucket. For other services such as GitHub, the process of adding your key will be very similar. You won’t have to generate a new key each time if you don’t want to, you’ll just need to copy your public key into your account settings on GitHub or other services.
With all of that out of the way, I think we’re ready to get to the fun stuff... our code editor and web server.
Visual Studio Code (aka, VS Code) - IDE
VS Code is a relatively new cross-platform open source code editor maintained by Microsoft. As far as free editors go it is a really great application and there are a whole lot of great extensions that we can enable so that it is configured specifically to the type of work we’re doing.
Let’s get started by downloading and installing VS Code. Once it is installed, take a look at the below list of extensions. The extensions you choose to install are completely up to you and should be focused on the type of work you do. You can install each of these extensions by clicking on the “install” button on the link provided, or by searching for the extension by name from within the VS Code application.
- Prettier - Code formatting for JavaScript and CSS.
- PHP Extension Pack - PHP debugging and code suggestions.
- Path intellisense - Provide path and filename suggestions.
- PHPCS - Code sniffer
- SCSS IntelliSense - Discovers the CSS class names we're using and provides them as suggestions when writing HTML or CSS.
- ES Lint - Checks our custom JavaScript code against any linting rules defined in a project.
- Drupal Highlighting - Provides syntax highlighting for Drupal files that don't have common file extesions. Such as .module and .theme files.
- Drupal 8 snippets - Code completion/suggestions for Drupal 8 functions/classes.
- Drupal 7 snippets - Code completion/suggestions for Drupal 7 functions.
- WordPress Snippet - Code completion/suggestions for WordPress functions.
- YAML - Syntax highlighting for YAML files.
- NPM - Provides the ability to execute Node scripts from within the editor.
- Code Runner - Provides a way to run scripts and small code snippets from the editor.
See documentation for configuring code sniffer.
DDEV - Web & Database Servers
There are a lot of solutions out there for running local web and database servers, but the one we want to focus on is called DDEV. DDEV is an all-in-one tool that is specifically designed to run websites on our local computers. It has additional support for Drupal, WordPress, and a few other common content management systems and frameworks, so it is a really great tool for us to use. Here is a short list of some of the features it has:
- Apache & Nginx web servers
- MariaDB database server
- PHP 7.x
- Drush (for Drupal & Backdrop sites)
- WP CLI (for WordPress sites)
- Composer
That’s a lot! Let’s get this installed and see how it works.
Docker - DDEV Prerequisite
Docker is a tool that allows our computers to run other applications container within very small Linux instances. Appropriately enough, these instances are called “containers”. For example, we can run our database server (MySQL) within one container and our webserver (Apache) within another container, and then instruct them to communicate with each other.
DDEV is able to provide all of these tools easily to us by using Docker containers for the various parts of the web stack. This is a very powerful approach to managing our local development environments, as it essentially gives each local website its own environment as a set of docker containers.
That all said, we don’t really need to remember all of that or know how to use Docker. DDEV will worry about all of that for us. All we need to do is install Docker on our computer, and like Sourcetree, Docker requires that we create an account to be able to download and install it. So, let’s start by creating a Docker Hub account. Once you have completed registration, follow the appropriate installation for your OS.
Note: Docker installation may require restarting your computer once complete.
- macOS - Docker installs like a standard macOS application. First, download the package, then install it like normal.
- Linux - Docker installation on Linux can vary from distro to distro and make use of a terminal window. The best approach is to visit the official Linux documentation and follow the steps specific to the distro we’re using. Keep in mind that the goal is to install the Docker Community Edition.
- Once Docker is installed, we need to configure our system so that we can make use of Docker without using the sudo command. Follow the steps outlined in this documentation to finish configuring Docker and testing that it can be used by non-root users.
With Docker is installed, we’re ready to get started with DDEV.
DDEV Installation
The creators of DDEV have made its installation simple for macOS and Linux users. The documentation contains a bit of code that can be run within a terminal that will automatically download and install DDEV. You can find the steps in the DDEV Installation document.
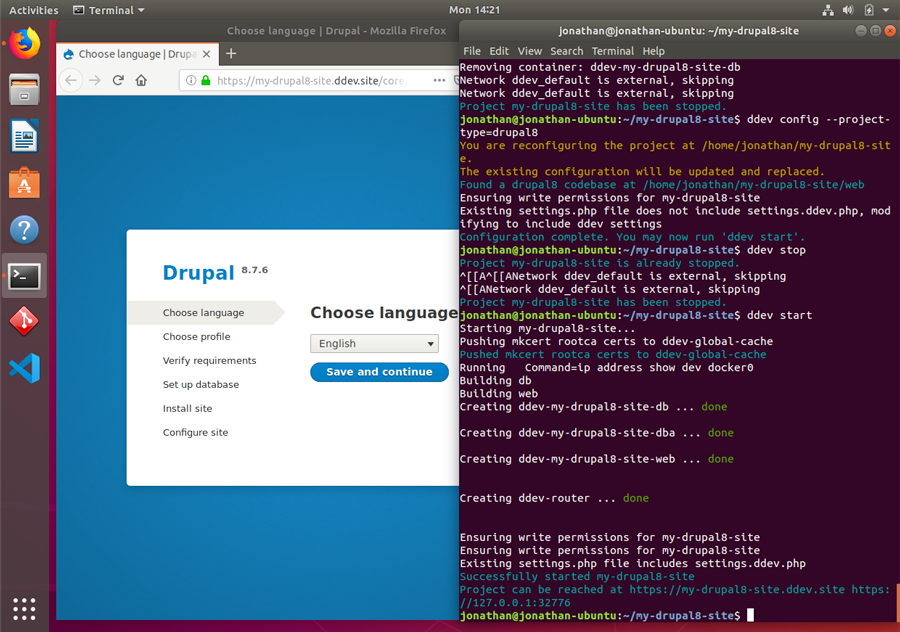
After we’ve run the installation script, we can test the DDEV installation but running the command ddev within our terminal. This is the command we’ll use to manage our websites. We’ll use ddev config to create a new site, ddev stop to disable a site, and ddev start to start it back up. There are a number of other useful commands that are fairly well documented within the DDEV docs website.
Setup a Drupal 8 Website with DDEV
Now that all our tools are in place, let’s test it out by following along with DDEV’s Drupal 8 Quickstart instructions. I’m going to modify them slightly, because I like to organize my sites within a specific folder on my system. Open a terminal window and perform the following commands:
mkdir -p sites/d8-quickstartcd sites/d8-quickstartddev config --project-type phpddev composer create drupal-composer/drupal-project:8.x-dev --stability dev --no-interaction --prefer-distddev config --project-type drupal8ddev restart
Once DDEV has restarted it will provide you with a link that you can use to visit your new local Drupal 8 website. We did it!