With new responsive websites, it's more important than ever to look at your site at different widths. But this can be time consuming and repetitive. Also, you may want to see how your dev site compares to your live site - for example "Did this small change I made to the css on one page change much on other pages?" Again, time consuming to do by hand. Luckily for us, here comes Wraith to the rescue!
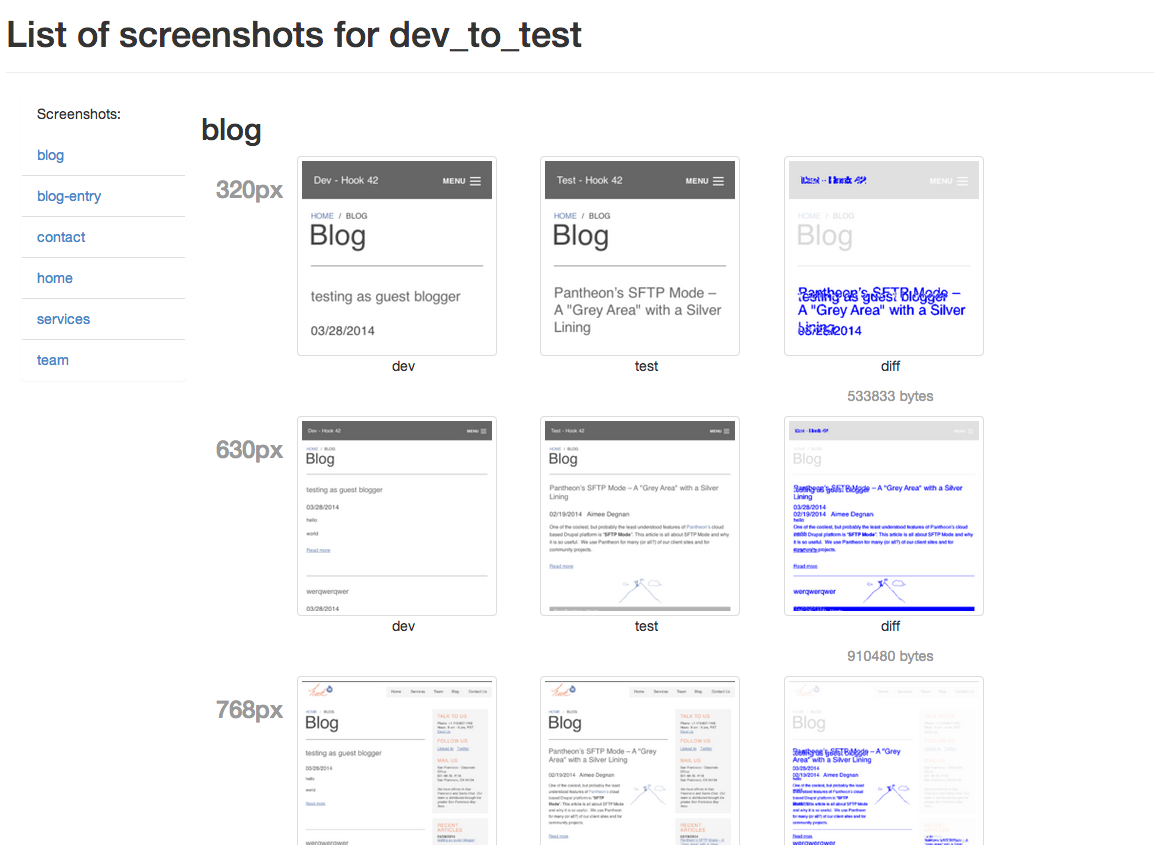
Wraith is a small piece of software that lets you automate comparing two versions of your site to see what the visual differences are. Wraith generates screenshots at different sizes and gives us a visual diff of two (usually similar) sites.
It was developed by BBC News and very kindly distributed as an open source project. You can find out more about it here: http://bbc-news.github.io/wraith/index.html
I attended Rupl's excellent talk on front-end ops at DrupalCon Portland 2013. Check out slides here: http://rupl.github.io/frontend-ops/#/ But it's taken me nearly a year to really delve into his suggestions, mostly because I'm more on the design side of things. But the promise of these tools is too great to let go, so here's my experience setting up Wraith.
It's pretty easy to get up and running - they have a good "Getting Started" guide here: http://bbc-news.github.io/wraith/index.html#GettingStarted - but it's a little dry and I needed to know a few more details to get mine working, so here's some extras to help if you're stuck.
Step 1 - Install Wraith
So if you have Ruby setup and you are living in a perfect world, you would just type into your terminal:
gem install wraith
And Wraith would be installed (and you could use it from anywhere). If this works for you, skip to step 2. This didn't work for me at all - I spent the next few hours figuring the following things out:
- If you are getting errors during this process like “Error: Cowardly refusing to `sudo brew install' You can use brew with sudo, but only if the brew executable is owned by root. However, this is both not recommended and completely unsupported so do so at your own risk.”
Then you may need to chown the referenced directories to your user (I had to do 3 times during installation) but don’t change usr directory - this made my terminal unusable. If you find your terminal unusable, run Disk Utility to repair permissions.
Also, if you are getting errors about not having the right version of Ruby installed, you may have to install a Ruby Version Manager. This is a bit tricky - instructions are here: http://rvm.io/rvm/install#explained (HINT: You want to search for "Installing the stable release version:" and follow the instructions from there.)
It's a bit tricky to setup, but once you do, the Ruby Version Manager will allow you to switch between versions of Ruby quickly. It sounds complicated, but really you would just type:
rvm use 1.9.2to use that version. You can find out more about RVM basic commands here: http://rvm.io/rvm/basics
Step 2 - Set Up Wraith
Wraith can be run from anywhere on your computer, but I find it's handy to have it installed in the project directory you're working on. For Drupal, I make a new directory in my /private directory (you may need to make this too) at the root of the Drupal installation. Here's an example of how I would do it (Starting from the root directory of my Drupal Install):
cd privatemkdir project_wraithcd project_wraithwraith setup
Now you should have new directories in your project_wraith directory - configs and javascript. You can stop using the terminal now if you would like, just go into your new configs directory and open the file called "config.yaml". Save this file to a new name - in this example "project_name.yaml".
Next we're going to edit this yaml file to compare the sites we want to compare.
Step 3 - Edit config.yaml (project_name.yaml)
If you open your new project_name.yaml file you'll see that it is a small file. You'll want to edit the following:
- Directory: Currently it should be called "shots". Name it something more specific like: project_shots - this will create a new directory that has all your compare files in it.
- Domains: there are two (and only two) - make these the two sites you want to compare - in my case: live: http://www.hook42.com and dev: http://dev-hook42.gotpantheon.com
- Paths: These should be the main pages of the site
Save this file and go back to your terminal.
Step 4 - Capture your shots
Go back to your terminal and make sure you're in the directory (project_wraith) where you typed wraith setup before
Now type:
wraith capture project_name (where project_name is the name you gave the yaml file before - you don't need the .yaml at the end)
Step 5 - Go Take a Look
Inside the project_shots directory there should be a file called "gallery.html" open this in a browser and you should see screenshots of the two sites you compared and a third that shows the visual difference between them.
Good luck with this!